Sunday, December 8, 2013

DIY Jingle All The Way Banner

Okay. It has been quite awhile since I've had time to post in here, let alone work on any craft projects. It's been quite the busy week at work to say the least. Here is the project that I was slowly but surely working on the past week.
The placement may move since it is currently a little low, but it really
adds to the holiday feel!
The best part about this craft project is that I went out to JoAnn's and Michael's on the Sunday of Black Friday week and got everything I needed on sale and plus some. Keep a lookout for coupons on online websites, apps, emails and even in the mail to help you out as some basic items don't always go on sale.


To Make Your Own Jingle All the Way Banner!

Things You'll Need:
- Cardstock (I used three colors: Red, Cream, and Gold Glitter)
- Sting or Ribbon (I used red raffia, but holiday inspired or plain ribbon would work as well)
- Jingle Bells (A medium sized bell works well)
- Glue (To attach the paper pieces)
-Hot Glue or E6000 Adhesive (To attach the bells)
- Small, single hole punch
- Plain Paper 
- Pencil
-Scissors
- Computer (Printer is optional)

Getting Started:
- To get started, look through your computer's available fonts or visit Dafont.com and pick out a font that you like to create your stencil. I used Santa's Sleigh found on Dafont. It's easy and quick to download and add to your font files.
- Once you have a font picked out, type your saying out into a word document and figure out what size you'll need your lettering to be. I used multiple sizes based on the letter size. 
- Now, if you have a printer, you could easily print out your letter stencils and cut them out, but for those of us without such a precious resource, take your paper to your screen and trace the outside of your letters. This will create a simple stencil for you. Don't press too hard while doing so, you don't want to cause any damage to your computer screen.
Tip: If you have a touch screen, such as myself, touch the screen in
more than one location at a time as to prevent the screen from shifting
while you are tracing.
- Once you have your stencils drawn/printed out, cut them out. After doing so, trace them onto the color cardstock that you wish your lettering to be in. For me, it was the glittery gold color. It only took one sheet and added a lot.
- Now cut those letters out as well! I found it easiest to break the page into smaller sections and work on each of those instead of trying to cut with a big, floppy page getting in the way. 
- Once you have all of the lettering cut out, you will want to attach it to a different color as backing. This step is optional, but I really liked having the cream back the gold on the red rather than just having the gold on the red. It really made it pop. You will then cut each of those letters out.
Simply glue the lettering to the cream cardstock leaving a little extra room.
When you cut it out, make sure to leave enough that you can see.
- Next you'll want to work on cutting out the background shape to attach the letters to. I used a "tag" shape myself. I made a stencil by cutting out a large rectangle, folding it in half and cutting off the upper corners. I then traced out 15 of these in red and 5 in cream and cut those out.
- After cutting each of the tags out, I backed them in the opposite color by using the same process of the lettering.

Putting it All Together:
- Start attaching your lettering to their backgrounds! I attached mine to the red.

- Attach your jingle bells (or some of them) to the other set of cardstock! I used two on each. For this, to ensure a good hold, I used the E-6000 Adhesive. 
The E-6000 takes a little bit longer to dry because it is not a normal glue.
Be careful!
- Next, punch two holes into each of the tags. Each on opposite sides. This is where you will weave your ribbon through to hang it up!
Don't fret too much about it being perfect!
- Now the fun part begins! You will start stringing it all together. I started with one of my jingle bell tags. In between each tag, I also strung a jingle bell. This helped with spacing, keeping the letters from falling on each other, and went with my theme. 
- I used another jingle bell tag between each of the words so it was easily readable.
- When everything was done, I used (with the help of one of my roommates) two small command hooks to hang it up.


Tuesday, November 26, 2013

DIY Holiday Ornament Wreath


I am normally not one to start any Christmas projects before Thanksgiving, but I just couldn't wait anymore. I had been seeing ornament wreaths all over Pinterest for months, and decided awhile ago that I was going to make one this year. I started going through all of the different pins for ideas on how to make it. Each one seemed to make their wreath in a different way, so I decided to go with my gut and just wing it. I started collecting ornaments from all over. I was going with a red, green, and gold theme which ended up adding in a bit of silver and white. I really wanted to have a few vintage pieces in there as well as keep the budget in control, so I scoured thrift stores. (Seriously, Julie [my mother] and I went to at least 5 in a single afternoon.) I started to get a pretty good collection. So much so that it started to take over my table, and that is when I decided it was time to begin.
Seriously, there was no room to do anything
with all these ornaments!

What you'll need:

- Varying sizes in ornaments. (Make sure you get a good variety so they can fit together nicely!) I used between 50-75
- Hot Glue and Gun (You'll need lots of this too)
- Foam Tubing (Go to Home Depot and grab a 6ft piece for 97 cents!)


- Tape (I used masking tape, but I think duct tape would work better)
- Thick Ribbon or 2 inch strips of fabric. (This is to wrap around your wreath form so it is less visible and the glue will have a better surface to stick to)
- Floral Wire (To make a hanger for the wreath)
-Scissors
-Optional: Glittery Puff Balls (I used these to fill in gaps) Garland, beads, pearls, etc
I got these from a thrift store 3/.99
but I'm sure craft stores would have
something similar

What You'll Do:

- To start, take your plumbing foam and cut it down to size. You'll want to cut it big enough so that when you form it into a circle, that would be your wreath form. (You could always buy a wreath form, but those are expensive and ain't nobody got the money for that.) I used hot glue on both of the ends and then taped it together to make sure it was secure.
- I felt there would be an issue with the glue sticking well to the foam/tape (plus it was ugly) so I wrapped my now wreath form in some thick green ribbon I had gotten in one of the bags of ornaments from the thrift store. I used hot glue to secure both of the ends and then went through and added a small dot between each of the layers to make sure they weren't going anywhere.
That little dip at the bottom came out super easy!
It just took a little extra shaping.
- Go through and take all of the little metal pieces off the tops of your ornaments. You wont need them, and they'll just get in the way in the long run. Some of the toppers (especially on smaller or lower quality ornaments) might not come off, and that is okay. You'll just want the majority of them off.
- Now it's time to get started gluing! You're going to want to do the inside of the wreath and the outside of the wreath first to create a base. Have the tops of the ornaments facing you. This will be the back of the wreath. Make sure you use plenty of glue to hold them on!
I used sort of a pattern for mine.
- Once you have a pretty solid base, flip your wreath over and start going to town with ornaments. Remember to vary the sizes so they all fit together nicely. When gluing the ornaments on, glue them not only to the wreath form, but to each other. Don't be afraid to use A LOT of glue. 
Note: Don't use your favorite or prettiest ornaments in the base. Most likely a good portion of them will be covered so no one will see them.


- Keep adding on the ornaments. Use a lot of variety in your sizing when filling in gaps and remember to look at your wreath from multiple angles including straight on (the way you would when it is hanging)
- Here comes your optional step: If you want to use glitter puff balls to fill in the empty gaps (or you could use garland, beads, pearls etc) do it now! I would set them up the way you think you want them to look before you start gluing just to make sure you like it. You can add a big bow in at this time if you'd like too. (I thought about it and I didn't like the way it looked, so I chose to do it without)


- You've made it!! This is your final step. Cut a decent portion of floral wire. You'll be making a hook/loop on the back of your wreath to hang it from. Wrap the wire around the wreath form, NOT the ornaments. Weave that little guy through and wrap it around a couple of times and make a loop on the back with it.


Voila! You did it!

You made a custom ornament wreath for WAY less than you would have paid in stores, and you did it your way. Now go hang it up and have people ask where you got it from.

Tips on Where to Get Ornaments!

So finding ornaments at this time of the year at a thrift store might be a little bit more difficult than one may think. Many people are out looking for them to put on trees or for various other projects. There are some other options, just make sure you keep your prices in check and don't go out of control. Make sure you check your price per ornament in packages and I suggest keeping it well below 50 cents an ornament (I didn't pay over 35.) Since it's the holiday season, many places are putting ornaments on sale.

- Target: Of course Target would be the first place on a list like this. They have an entire, huge holiday section. Look for deals on Cartwheel and the Target app. Also, they have a tube of mini ornaments in the dollar section that were a life saver for me!
- Big Lots: I got a great deal on some ornaments on sale here. They had a big variety and were not very costly.
- Five Below: While I didn't purchase any ornaments from here, they did have a fairly decent selection. 
- The Dollar Store: Not the first place you would think to look, but they have some pretty good deals!

Wherever you get ornaments from, make sure you like them! You'll be looking at these for the rest of the holiday season. Don't just say "I guess I could hide these and use them as fillers." If worse comes to worse, get some clear bulbs from Michael's and make them your own!

Sunday, November 24, 2013

Fall Kitchen Takeover on a Budget Part 2.

So, as I said in the original post, I am taking over my kitchen to be very fall themed. It has been quite the busy week for me, so I haven't gotten to catch up on the last few projects I had left to do.

Thankful Tree


This was one of the projects that required my entire house and all of our guests to participate in. Luckily for me, they were actually willing to participate in this one. Each person drew a hand and wrote things that they were thankful for on them. There was a pretty good variety.

Our tree is to the right. We used a variety of colors for the hands that
allowed people to express their personalities. We even had someone use a
glove to express what they were thankful for. 

Glitter Leaf Garland


This project I had seen on Pinterest and gotten the inspiration from this post from 6th Street Design School. I changed things up a bit and here is the process that I went through.

The things that I used for this project were:
- Artificial Leaves (Found a bag of 50 at the dollar store!)
- Various fall colors of glitter (I found some on sale at Michael's and paid $2 for a large variety of colors)
- Elmer's Glue Stick
- Jute String
- Single Hole Punch
- Clear Spray Paint

To start, I used the cardboard backing from the pack of glitter I had and laid a few leaves down on it. Then I went to town with the glue stick and completely covered it. Using a variety of glitter textures and fall colors, I covered the leaves using my finger to help spread the glitter while conserving it at the same time. I covered about 30 leaves. 
Next, I gave the leaves time to dry. (Really, I needed to go buy the spray paint.) When they were covered, I laid them all out on a box and covered them with clear spray paint. This step is optional, but it keeps the glitter from falling off everywhere. Once they were sprayed I made sure they weren't stuck to the box, and then allowed them to dry. 
After they were dry, I went through and used a single hole-punch on each of them near the top. This allowed me to tie the string through it. I slid the leaves through (so the first leaf I put on would be the top) and tie a simple slip not in it. I made four strands with 5 leaves on it and four strands with 3 leaves on it. I used one of the strands of 5 as the top base and tied the other strands off of that. (I did this after hanging the first strand on the wall)
To hang my garland on the wall, on the top strand, I created a small loop at each of the ends and used small command hooks.
The finished product.

This was the perfect project to liven up some dead wall space and add a little sparkle to the kitchen/dining room! 


Thursday, November 14, 2013

Kittens Mittens and all that Smitten

Let me start by saying nothing yesterday went as planned. I had a whole plan on what to write about (I guess I'll be saving that one for another day,) planned on going home quickly after work, and seeing my man friend. None of these things panned on. I was too tired to write last night, but that was because of two new, little friends that I brought home last night.
Meet Grey Kitty
Meet Black Kitty.


Neither of these two little gems have real names. I rescued them when one of my mom's friends was evicted. These were her outdoor cats who have never been inside or been to a vet (which we are visiting tomorrow.) It is already quite the adventure, but might be just what I need to stay out of trouble.

Tuesday, November 12, 2013

Time to be Thankful

Normally I'm the person who believes you should be grateful for things all year long. Usually (generally on Sundays) once a week I will make a list of about 5-10 things that I am thankful for that week. It's a really great way to make myself feel better on a bad day and remember all the things that I have been blessed with. Since it is November and the month of Thanksgiving, I feel we put a little more emphasis on the things we are thankful for. Here are a few of the things that I am thankful for this month.

A job that works around my life: I am very thankful not only to have a job, but a job that works around lief and things coming up. Yesterday I felt the onset of a migraine coming on. Luckily for me Mondays are my "office" days spent in our warehouse organizing disposable packages and folding napkins. I was able to leave and come home four hours early. I then slept for the next 16 hours to get rid of said migraine.

The people in my life: I might not always make the best choices in people to have in my life, but they have all taught me some sort of lesson. The people who have managed to stick it out with me through all these years are pretty fantastic. Recently some not so great situations have come about, but I've had some pretty great people on my side to pull me back up.

Days off: These aren't very frequent, but with a to-do list piling up (along with my laundry) Thursday and Saturday can't come soon enough. Days off never seem to last long enough to get everything that needs to be done completed. 

The fact I no longer have class/finals/homework: Living with people who still have classes and homework makes me so thankful that I no longer have this stress in my life. I still have work that I bring home with me from my job that needs to be done, but it is generally a lot more fun than "read these 6 chapters and complete these study guides"

The Postal Service: No, not the band. The actual United States Postal Service. I'm pretty big on sending out cards and letters lately. I've got to get my nephew's [late] birthday present in the mail along with his thanksgiving card and a few other cards out ASAP. Just think about how much joy a small note from someone far away can bring you. Everyone likes to get fun mail once in a while.
Side note: If anyone knows what a 12 year old boy would like for Christmas, please fill me in. I seriously need ideas.

The ability and time to try new things: Yes. I am thankful for the time to craft. I'm also thankful for the time to try new activities and foods, but mostly the time to craft. For a long time I hadn't really been giving any time to myself to do things I like, but recently to stay out of trouble, I've taken to crafting again. My next project is this glitter leaves garland from 6th Street Design School. I'll let you know how it goes.

Of course I am thankful for things like having a roof over my head, being able to pay my bills (and send out presents,) having food to eat, and my family and friends, but I really like to try and think about things that are a little different to be thankful for. Give it a try. What are you thankful for?

Monday, November 11, 2013

Fall Kitchen Takeover on a Budget

One of the biggest things that gets me is people skipping over Thanksgiving and right to Christmas. Maybe this is because my birthday falls just before Thanksgiving, but I really enjoy fall holidays and hate the fact they easily get skipped over. My roommates, friends, and coworkers know this and love to torture me by going all out Christmas the day after Halloween. As part of my mission to celebrate fall holidays, this year I decided that I would force my roommates to join  with me by decorating the house accordingly. Thanks to Pinterest and Big Lots, I was able to do so on a budget.

 This is the final product in the kitchen. At least for now. The table decorations came from Big Lots and I spent less than $15 on everything. The inspiration for the banner came from a friend's Instagram of a Pinterest inspired piece. While I made mine by my own design here's a link to a similar page found while searching "Thanksgiving Garland" on Pinterest. I used some leftover burlap from another craft project, cut out 11 triangle sized pieces and got to work. I used a waterproof marker to mark off the letters I would need onto the burlap. Then I used a silver/mettalic gray (my white seemed to have disappeared from the craft drawer) acrylic paint to go over them. I put 2 coats on, maybe 3 for the more finicky letters and let them dry for a bit. Using some jute string and some heat 'n bond I got to work stringing them together. I left about an inch and a half of space between each piece. I tied loops at each end and used small 3M hooks to hang it up. The entire project took about 45 minutes to complete.

This is a better look at our kitchen table! No one ever eats in the kitchen, so our table is usually full of things, as you can see it quickly accumulated. Everything on the table I got for some great prices! The table cloth only cost me $3! And the centerpiece with the candle holder in the center was on clearance for $8.50. Filled with some potpourri to help the house smell a little more festive. The entire kitchen rang in at under $15.
Picked this up for only $2.99 at the Salvation Army.
Great addition to the fall theme and adds a little something
to the desk area in our kitchen.


We also are working on having a "Thankful Tree" on our very blank walls in the kitchen. This is also known as "Caitlin turns her roommates into second graders" because I no longer have kids who will willingly and excitedly craft with me.


"Symbolizing eternal hope, a wreath goes round and round. And where it starts or ends cannot be found."


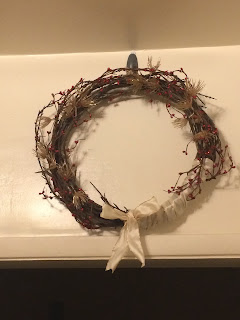
As part of my mission to stay out of trouble, I've been crafting among other things. One of my projects that I wanted to take on was to create a wreath that could be used as a transition from the fall holidays into the winter holidays. In case you didn't know, wreath forms are not the cheapest thing in the world, especially when you're on the kind of budget I was trying to stick to. So I decided I'd try my luck at a thrift store and try to find one to deconstruct and make my own. After my first stop was a complete bust, my second stop was a gold mine. There were a ton of wreaths at great prices. I picked up this gem for $1.99 and made a pit stop at Michael's on the way home to do it up.
Not the most holiday looking wreath in the whole world, huh?

So to start, I had to remove each of those beautiful little flowers from the branches. Luckily for me, they easily popped off and I will be taking them into work to use for a project there. Next, I had to rewrap and tuck the branches to make it more uniformly shaped. I used some champagne/ivory colored ribbon I picked up 60% off at Michaels (under $3) and began to wrap a small section of the wreath. Next I added some "cranberry" garland I picked up on sale.I made a bow out of the same ribbon I'd wrapped the wreath with and hot glued that into place. Finally, using some small glitter covered branch/flower things I brought the whole ivory, champagne, and red color scheme together. It is now hanging above the doorway between our kitchen and living room.

So I'm Starting a Blog

These are the words I never pictured myself saying, but here I am.

A little bit about myself:

That's my mom and I on my graduation day. 
After too much time and a few focus changes I graduated in April of this year with a Bachelors in Elementary Education. Now one would expect with such a degree that I would be using it in a classroom or working with children. On the contrary. Ever since working for the Air Force in 2011, my goal has been to work for CYP for the military. However, due to hiring restrictions and the government shutting down for a bit, that isn't quite possible at the moment. In the mean time I'm part of the management team of a small catering company.

I'm working on transforming myself into the person I want to be. I am truly working towards being more gracious, brave, and compassionate in life. I'm trying to stay out of the trouble I'm usually good at stumbling into. Bear with me as I embark on the journey of blogging about my life.